Archives

0

GIMP TUTORIAL - How to apply a logo image to a textured background image

pvdesigns

image

In this tutorial, we will see how to apply a logo image to a textured background image such as bags, shirts, vehicles and more. We will be using the Perspective tool, Bump Map, various Blending Modes and the iWarp filter in GIMP. This little technique can be used for fun or image branding.

We will be creating this…

image

We start by launching GIMP and opening up our background image. In this first part of the tutorial, we will be using this image of a paper bag (paperbag.jpg).

image

Next, we will open our logo as a layer by selecting “File>Open As Layers…” from the menu.

image

I recommend you use a logo in “.png” format where the background has already been removed. For this tutorial, I am using “Wilbur”…the GIMP mascot. Download wilbur.jpg.

image

Now, we need to adjust our logo’s perspective to align it with our background image. From the Toolbox, select the Perspective Tool…

image

Click once on your logo to activate the Perspective tool. By clicking and moving the 4 corner handles and using the background image as a guide, adjust your logo’s perspective to match that of the bag. Once adjusted, click the “Transform” button to apply.

image

Our logo should look something like this…

image

In this next step, we want to apply a Bump Map filter that will transfer the paper bag’s texture to our logo. From the menu, click “Filters>Map>Bump Map”.

image

From the Bump Map filter window, use the scroll bars to center your logo in the preview pane. Then, from the Bump Map drop down list, select “paperbag.jpg” for your bump map texture. Everything should work with default values. Click “OK” to apply.

image

It may not seem like anything’s changed, but if we zoom in to 100% or 200%, we can see that the logo now has the same texture as the paper bag.

image

From the "Layers Panel" Mode drop-down list, select "Multiply". Depending on your background texture, the Multiply blend mode may or may not work. Generally, Multiply works well on darker backgrounds whereas Overlay or Hard Light/Soft Light blend modes may work better on lighter backgrounds.

gimp_logo_texture13

Also, adjust layer opacity down to 75-80%.

gimp_logo_texture14

We get the following...

gimp_logo_texture16

That's already looking pretty good but, with a few touches using the iWarp filter, we'll get this logo looking like it was always on that paper bag. To launch the iWarp filter, from the menu select "Filters>Distorts>iWarp".

screenshot.7

The iWarp Filter is an interactive tool that allows you to distort an image layer by moving, growing, shrinking (and more) image sections with simple brush strokes. I ususally use a combination of the "Move", "Grow" and "Shrink" deform modes. I use shrink on areas that are shadowed, grow on areas that bear highlights and move to complement. You'll not here that I am using a deform radius of 20. You can adjust this to suit your needs.

screenshot.8

All the work is done in the preview window in the upper left of the iWarp dialogue. Click and drag over areas of the image you wish to distort. Don't forget to alternate between move, grow and shrink modes. I tend to work with the actual image visible in order to estimate where to apply distortions. It would be a wonderful addition to GIMP if the iWarp filter preview showed all layers instead of just the active one...but, alas, ths is not the case.

screenshot.10

screenshot.9

Once you are satisfied with your distortions, click the "OK" button. You can always undo distortions using Ctrl+Z or add more by returning to the iWarp filter (Filters>Distorts>iWarp).

Here is what our logo looked like prior to iWarp distortions:

screenshot.11

...and WITH iWarp distortions:

screenshot.12

There you have it! Here is another example of this technique where I applied the dodisdodat logo and gimp logo to this image of a 2010 Chevrolet Camaro:

image

Thanks for reading and have fun!

0

3dsmax 3d model ladder studio tutorial

pvdesigns

Here I will show you about 3dsmax 3d model ladder studio tutorial.
I have used following techniques in this 3ds max tutorial.
Editable poly techniques

[1]-First of all you will press (ctrl +N) now you will see the new window is open
Click on the Geometry > Standard primitives > Plane and use the following setting
Create a Plane in the top view and set like this in the Perspective view
3dsmax-3dmodelladder-studio-tutorial1

3dsmax-3dmodelladder-studio-tutorial2

3dsmax-3dmodelladder-studio-tutorial3

[2]-Click on the Geometry > Extended primitives > Chamfer Box and use the following setting
Create a Chamfer Box in the top view and set like this in the front view
3dsmax-3dmodelladder-studio-tutorial4

3dsmax-3dmodelladder-studio-tutorial5

3dsmax-3dmodelladder-studio-tutorial6

[3]-Select the Chamfer Box and convert into the Editable poly
Then select the vertex Mode in the Editable poly
Make a selection like this and press (Delete)
3dsmax-3dmodelladder-studio-tutorial7

3dsmax-3dmodelladder-studio-tutorial8

3dsmax-3dmodelladder-studio-tutorial9

[4]-Now your image should like this left view
3dsmax-3dmodelladder-studio-tutorial10

[5]-Now click on the Mirror Button and you will see the Mirror window is open
use the following setting Your object should like this
3dsmax-3dmodelladder-studio-tutorial11

3dsmax-3dmodelladder-studio-tutorial12

3dsmax-3dmodelladder-studio-tutorial13

[6]-Use the following setting create a Box in the top view
Set like this in the top view
3dsmax-3dmodelladder-studio-tutorial14

3dsmax-3dmodelladder-studio-tutorial15

[7]-Select the box drag it and release you will see
The clone option window is open then uses the following setting
Your image should like this in the left view
3dsmax-3dmodelladder-studio-tutorial16

3dsmax-3dmodelladder-studio-tutorial17

[8]-Now click on the Mirror Button and you will see the Mirror window is open
Use the following setting your object should like this in the left view
3dsmax-3dmodelladder-studio-tutorial18

3dsmax-3dmodelladder-studio-tutorial19

3dsmax-3dmodelladder-studio-tutorial20

[9]-Use the following setting create a Chamfer Box in the top view
Set Chamfer Box like this in the left view
3dsmax-3dmodelladder-studio-tutorial21

3dsmax-3dmodelladder-studio-tutorial22

[10]-Open the material window
Use the following setting create a material like this
Assign to the given object
3dsmax-3dmodelladder-studio-tutorial23

3dsmax-3dmodelladder-studio-tutorial24

[11]-[16]-After assign the material you will see the final is ready
Save the file in your folder
Thanks for watching my tutorial
3dsmax-3dmodelladder-studio-tutorial25

0

Todd Kopriva - Live Interview

pvdesigns

todd-kopriva


Todd Kopriva is the Documentation Lead for one of the most successful Computer Graphics software applications of all time, Adobe After Effects. Through this live webinar interview, he will be offering a unique insight into his career and position at CG software giant, Adobe...

Todd is passionate about helping people create a habit of turning to Adobe Help, forums, FAQ lists, and Community Help search to get answers. He spends an incredible amount of time and effort creating and collecting good materials and search engines for the Adobe user community.

He is constantly writing through his blog feed at blogs.adobe.com and is able to offer a unique perspective through his position as Lead Documentation guy for Adobe After Effects...

He is the man in charge of the Adobe After Effects Help and Support site, which is definitely one of the most definitive and useful resources for any After Effects user or operator. This site also includes the fantastic Adobe Community Help which brings together active Adobe product users, Adobe product team members, authors, and experts to give you the most useful, relevant, and up-to-date information about Adobe products...

This a unique opportunity to for you to interact live with Todd, who definitely has his finger on the pulse when it come to After Effects and Adobe. You may have some feedback or simply would like to know what is involved in managing the documentation and help resources for arguably the most popular compositing package on the planet....


Join us for this free, live, in-depth interview, with one of the industries gurus. Find out how this highly respected Adobe Lead, got into the world of CG, and the path he took to get to the highest level... Don't miss out as there are limited seats available and only live attendees will have the opportunity to ask Todd questions in a live, interactive Q+A session...

To register for this exciting live session simply click the registration link below. And did I mention, It's absolutely FREE...

Session Details:

Use the World Time Calculator to calculate your time zone...

0

Automotive Lighting Rear Lamps, Design in Light....

pvdesigns
Automotive Lighting is a leader in the research, development, and production of a complete range of technologies for front and rear lighting, fog lights, head-lamp, and other electronic components.

Automotive Lighting Rear Lamps Italia, a division of Automotive Lighting, has used solidThinking since 2001 in three phases of the product development cycle: ideation, development, and visualization.


Click here to download the PDF and read the story.
0

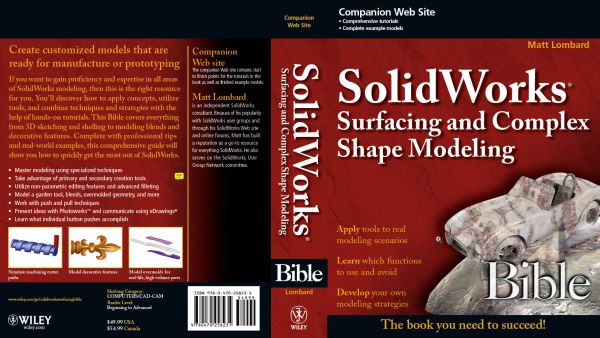
SolidWorks Surfacing and Complex Shape Modeling Bible

pvdesigns ,

This book explains some of the elementary concepts of surfacing, and goes on to talk about tools and techniques. The last part of the book has several tutorials done in a conversational style, where I go through how I modeled parts, including how the decisions were made to use various features. This is not just a “do this do that” tutorial where you get the instructions to make a complex shape but never understand why you would do this or do that.

I have also broken the information into Primary Shape Creation Tools, and Secondary Shape Creation Tools, which I think is essential to understanding the surfacing workflow. This book is really written for people who are pretty good with SolidWorks, but want to know more about surfacing and complex shapes.

There is a chapter devoted to splines, in addition to a chapter just on general sketching for surfaces and shapes, and a further chapter on curve features. If you’ve been wondering about how surfaces can improve your modeling skills, this is your book. There is some overlap between this book and the 2007 Bible, but this book is definitely more involved.

0

Catia Imagine and Shape

pvdesigns ,

imaginenshape
Catia has a product called Imagine and Shape that sounds like a product I would like to work with. Maybe some of you have some functional experience with this and can comment on its merits, up or down. This product has been around for what looks to be about two years, based on what I’ve read about it.

imaginenshape1Imagine and Shape is essentially a subdivision modeler that is somehow able to share meaningful data with engineering and manufacturing applications in Catia such as Part Design and Generative Shape Design. I’m not positive about this, but I take all of that to mean that it is somehow able to generate nurbs surfaces from the mesh data. The technique used to control shapes would take some getting used to, but it is much faster than the surface modeling that SolidWorks users are used to. You start from a shape primative, and tug and pull on a control frame much like the control polygon available to edit splines in SolidWorks. There is a bit of number tweeking to make transitions smooth or sharp. Other wise, this looks like a minimal interface, and a fast technique. It looks like there are also some capabilities for ribbing, bosses and functional plastic features inherited from ImpactXoft.

imaginenshape2

It is sometimes tempting to compare this type of concept modeler to Cosmic Blobs, but I don’t think that applies in this case. Imagine and Shape is not driven by dimensions, but it does allow you to get more precise shapes than Cosmic Blobs, or some of the other “blob” concept modelers I’ve mentioned here like Shape Shop, Shark!, Â MoI, and so on. I’m sure it costs a fair bit more than any of those as well.

I keep hoping for a complex shape concept modeler to rescue me from SolidWorks. This one has been available for a couple of years, but it hasn’t seen much popularity with SolidWorks users. A few unknowns still exist around Imagine and Shape, but it at least does seem to do what I expect a complex shape concept modeler to do. How well it communicates with nurbs modelers will be the real test.

SEE DIS TUTORIAL

 
Copyright 2010 koooooooooooooooo